I have not been to a food tasting before. Therefore, when DreamersLoft asked if I was interested, I was both elated and hesitant. Elated because I finally got invited. Hesitant because of the recent saga involving a famous food blogger. After much consideration, I finally agreed.
This place that we had our food tasting is Chaozhou Inn. Looking into the interior, it's like those posh restaurant which you might not want to step into. The ambience looks classy and warm.
As I belong to the Hokkien dialect, I have not much knowledge about Teochew food except for steamed pomfret and yam paste. Through this food tasting, I got to know more about Teochew food preparation, what are the more authentic Teochew likenings and the taste. I was in the great company of three others- Precious Moments, DreamersLoft and a lady from omy.sg. Sharon from Fish & Co group, was our host for the afternoon.
The first few items were from their Dim Sum selection (潮式精美点心).The Steamed Spinach Dumpling with Prawn & Dried Scallop 瑶柱菜苗饺 ($4.50) has a smooth and thin skin. With the diced water chestnut, it adds an extra crunch to the dumpling. The dumpling is moist, and the prawn is fresh.
Next came the Braised Pork Belly Bun Chaozhou Style 鲍汁扣肉包 ($3.60). The bun is soft, and the braised pork belly isn't too fatty. The soft shredded yam blends well with the pork belly and the bun. If more sauce is added to bun, it'll be better. The pork belly is so lean I wasn't picky about removing the fats, which I normally will.
The Pan Fried Black Sesame Cake 豆沙煎软饼 ($3.90) combines softness with crispiness. The red bean mochi, topped with black sesame seeds, is pan fried lightly. The mochi is warm and soft, which compliments the crisp and fragrant black sesame seeds very well.
Next, we were served the Double Boiled Old Yellow Melon Soup 八宝老黄瓜炖盅 ($8.00). This soup is very special. The soup is served inside the cut yellow melon. The soup was really very tasty. There are lotus seeds, mushrooms, sea cucumbers and shrimps, all diced to bite size for ease of consuming. We understand that there are a lot of work into preparing this dish.
From the Marinated / Barbecued Selection 烧味卤水, we had Braised Platter Chaozhou Style 潮州卤水拼 ($10.00). I'm not a fan of duck. However, I found that the duck wing and braised duck taste pretty good. At least it doesn't have a strong duck taste. I also tried the gizzard. I found it to be a bit hard though crunchy. I had it with chilli, in case I don't like the taste. The toufu is very silky and smooth. It has that kind of melts in the mouth taste.
I dislike oysters. However, this Battered Fried Oyster 金钱蚝仔酥 ($8.00) is good enough for me to have two! (Can you imagine?) The batter was very peppery and crispy. It could be due to the strong peppery batter that musked the oyster completely. If you are like me, don't take raw or cooked oysters, then you'll have to try this! Likewise, if you are a big oyster fan, then maybe this dish is not for you.
The Steamed Pomfret Chaozhou Style 潮式蒸仓鱼 ($22.00) is really worth the value. The pomfret is enough to feed 10 persons! The broth taste really good! The pomfret is steamed with leeks, tomatoes, mushrooms, veg (tang orh), carrot, sour plum, salted vegetable and shredded ginger. Even though there is a lot of ingredients used, it was just enough that it didn't overpower the clearness of broth and the fish!
They have recently introduced the lunch special which comes with complimentary soup. We tried the Steamed Rice with Spare Ribs 原盅豆豉排骨饭, with Winter Melon soup (soup of the day) 附加每日例汤 ($6.90). The spare rib has a slimy taste, although the black bean sauce goes well with the rice. The winter melon soup is sweet and good too! This lunch special is a wholesome meal itself.
Next, we had Chao Yang Four Treasure Vegetables 潮阳四宝蔬 ($9.00). The four treasures are mushrooms (button, straw & shitake), beancurd, lotus seeds and chinese cabbage. The chinese cabbage was so soft it melts in the mouth. It also absorbed much of the gravy that makes it very sweet.
The Pomfret Porridge Chaozhou Style 潮州仓鱼粥 ($12.00) is served from a small claypot, which looks like those used to brew medicine during our ancestor times. The soup is very tasty, and the fish slices are very fresh. However, I tasted a portion of the fish head which was very fishy. According to Sharon, all the parts of the fish are used to cook the porridge.
Finally, we came to the dessert (甜品) part. My favourite dessert was served - Yam Paste with Gingko Nut and Pumpkin 福果芋泥 ($4.90). This truly lives up to its name. The texture is very smooth even though it has bits of yam pieces. I like the small bits though. The sweetness is just perfect for me. The combination of pumpkin and gingko nut are just enough to compliment the yam.
Their Homemade Soya Beancurd 桶仔豆腐花 ($4.50 for 2 pax. $7.00 for 4 pax) is served in a beautiful wooden container. The beancurd is very soft and smooth. Good thing that there is no sugar added to it. Eating it without the syrup was truly good for me. However, you can add their pandan sugar syrup, which I find that it's too sweet. There is only a very faint smell of pandan in the sugar syrup, but you can't really taste the pandan though.
Finally, Sharon let us try their latest creation - Sweet Potato Paste with Pineapples ($3.20). Surprisingly, the sweet potato paste is very light. Unfortunately, it was so sweet none of us could take it! The chef told us that butter was also added to it, as we could tell there was more ingredients than what we knew. The pineapples used are canned pineapples.
They have promotions during weekdays. A-la-carte high tea buffet from 3pm-5pm. Adult @ $14.90++, Child @ $8.90++. Lunch specials @ $6.90++. They also serve a-la-carte buffet dinner from 5pm onwards. Adult @ $39.90++, Child @ $15.00++.
Overall, I am very happy with the foods they served. It is those places where you can please your parents or your future parents-in-law. I'm definitely going to bring my in-laws there for a meal.
Thank you Sharon, for hosting this fun and wonderful session.
Chaozhou Inn
80 Marine Parade Road, B1-84D,
Parkway Parade, Singapore 449269
Tel : 6346-6617
(This food tasting was sponsored by Chaozhou Inn).
Lately, I'm into baking breads, or mantous (like what Reese said). Mainly because nobody wants to eat cakes or such. Breads, to me, is more practical as I'm a bread lover myself. I also know that if I bake breads, my siblings will be more than happy to have them, compared to cakes, which I still have to coax them to bring home. :p
I bought some organic unbleached whole wheat flour from Jusco quite sometime back. I decided to use this flour to make my healthy black sesame buns, to make it more authentically healthy!
These buns weren't cottony soft. It's more of the dense type. Almost similar to artisan bread. It was probably due to the flour that I used. However, I like this kind of breads. I will continue to use this kind of flour, even though it costed more. So that I can eat my bread without feeling the guilt from the carbo.
Recipe for Black Sesame Healthy Bread, extracted from "Baking Code" by Alex Goh.
(Makes 21 rolls)
Ingredients:
A:
600g Bread flour (Organic unbleached whole wheat flour for breads)
45g Black sesame, toasted and grounded (I used instant ground black sesame)
10g Instant yeast
60g Fine sugar
6g Fine salt
25g Milk powder (I omitted this)
B:
120g Overnight sponge dough (I used 150g, all of it)
370g Cold water
C:
50g Butter
D:
30g Black sesame, toasted
30g White sesame, toasted
Method:
1. Mix A until well blended. Add in B, knead to form a dough.
2. Add in C, knead to form a smooth and elastic dough. Add in D, mix until well-combined.
3. Cover it with cling film, allow it to proof for 60mins in a warm place.
4. Divide the dough into 60g each and mould it round. Brush the dough with water. Coat it with black and white sesame, place it onto the flower-shaped mould*.
5. Allow it to proof for 50mins. Bake at 190C for 15mins.
* I proofed them in a 9" and 8" round cake pans, and 4 small tartlet pans (refer to below). The ones from the tartlet pans turned out quite nice, with a flower-shaped bottom.
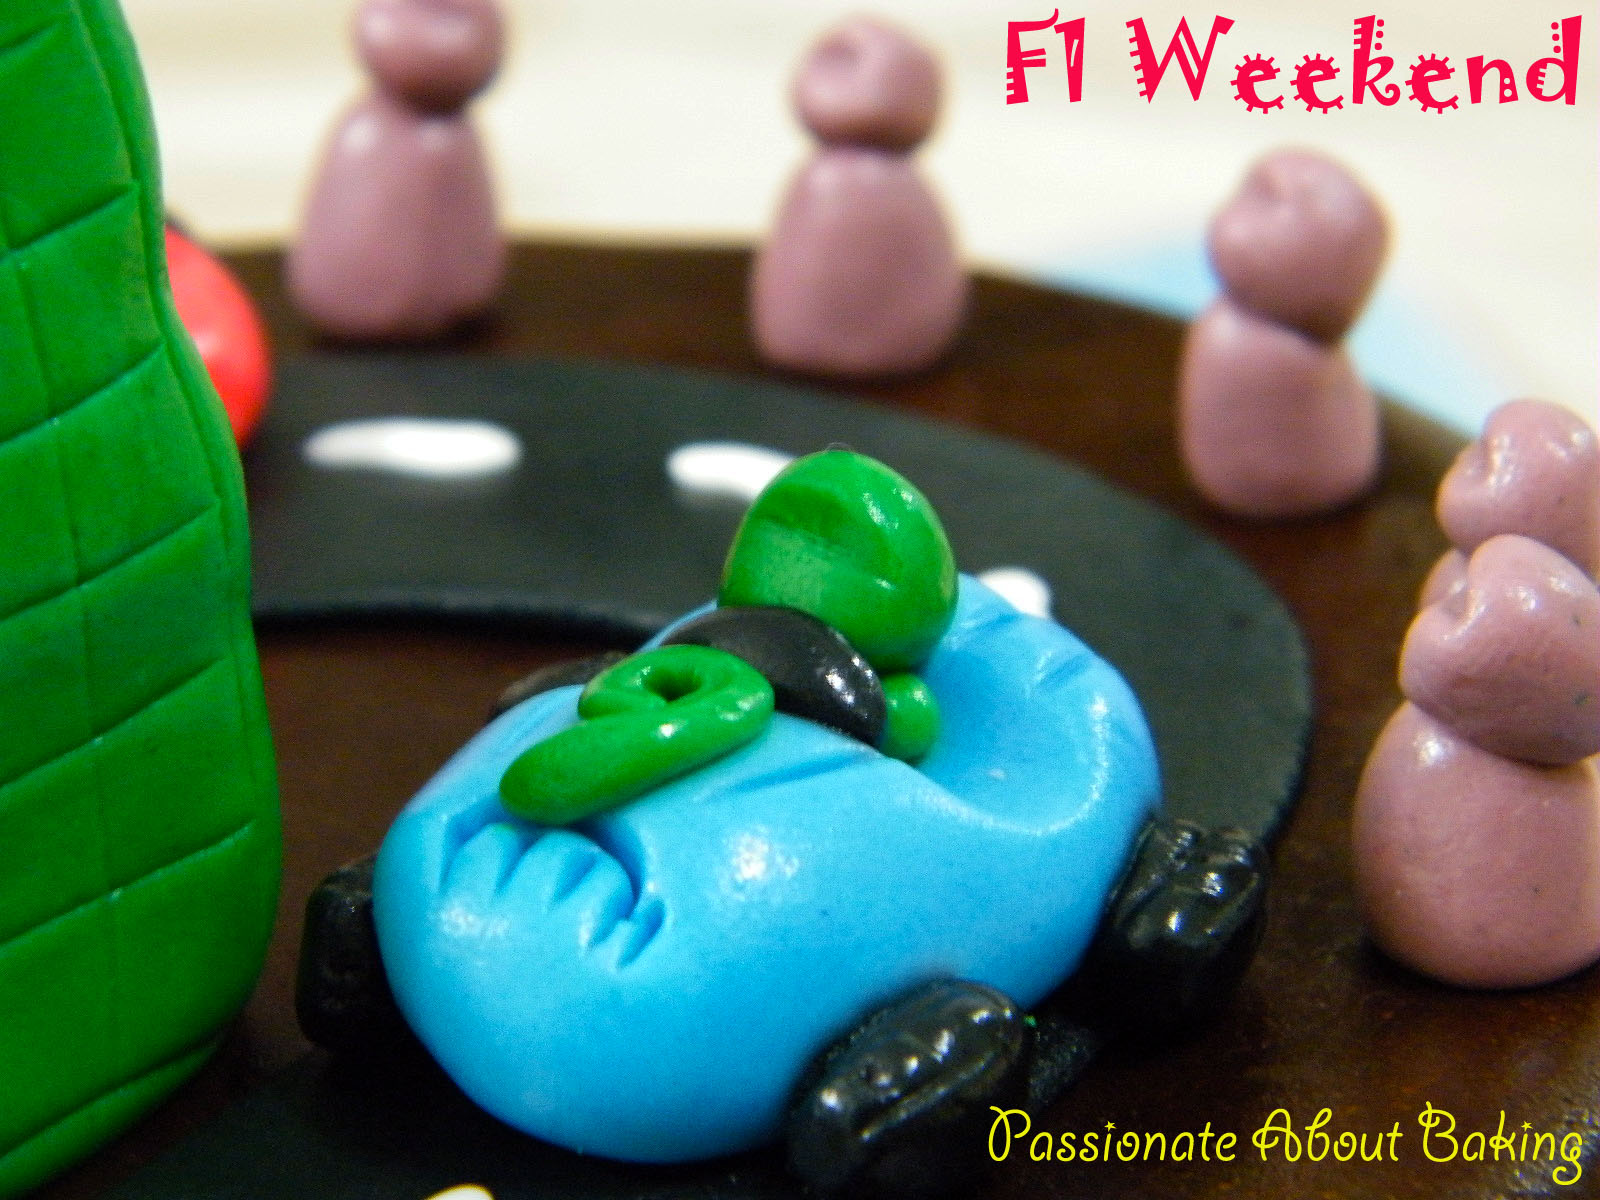
Feeling bored on a F1 Friday evening, I decided to practice my fondant. This was what happened.
The following day, after baking some cake and bread (which will be posted up later), I got bored of the F1 layout, and decided to destroy the buildings. (Heehee...) I turned it into a piece of greens and made some rolled roses on it. My daughter helped me with the roses too!
After I took some pictures, guess what happened? I destroyed the whole thing! Sadist? Not at all! This was made on a dummy cake (styrofoam). It was only a practice session (on Friday)... The actual competition is on Sunday evening. I meant...the Singapore Grand Prix.
I was looking for some inspirations to bake my bread. So I asked my eldest son what would he like. He replied me "Oreo". It sounded weird to have oreo in the bread. And he wanted it wholesome in the buns, not crushed, nor any other way. So I obliged.
I made one recipe of the Queen Bread from Baking Code. Separated into two portions. One portion, I proceeded with the Queen bread, the other portion, I made into buns, a mixture of oreo buns and red bean buns.
Recipe for Queen Bread, extracted from "Baking Code by Alex Goh"
(Makes 2 loaves, but I only make one loaf. The other half dough I made into buns.)
Ingredients:
A:
500g Bread flour
75g Sugar
6g Salt
20g Milk powder
8g Instant yeast
B:
150g Overnight sponge dough*
1 Cold egg
240g Cold water
C:
90g Butter
Method:
1. Mix A until well blended. Add in B, knead to form a dough.
2. Add in C, continue kneading to form a smooth and elastic dough. Cover it with cling wrap and allow it to proof for 60mins.
3. Divide the dough into 4 pieces, mould it round. Allow it to rest for 10 mins.
4. Roll out the dough, roll it up like swiss rolls. Allow it to rest for 10 mins. Repeat the step one more time. Place two dough onto the greased loaf tin. Makes two loaves.
5. Let it proof for 50mins. Cut the top with scissors. Place some butter on top and sprinke some sugar. (I had forgotten to do this! I left the top plain and just baked it!)
6. Bake in pre-heat oven at 180C for 35mins.
*Overnight Sponge Dough (use all)
(makes approx. 155g dough)
Ingredients:
100g Bread flour
60g Water (room temperature)
1/4 tsp Instant yeast
Method:
1. Mix the instant yeast with 20g of water until well-blended.
2. Add in the remaining ingredients and knead to form a dough.
3. Let it proof for 30mins.
4. Wrap in cling film and keep in the refrigerator overnight.
The beautiful loaf baked from the galvanised loaf tin. One of my favourite baking tool!
I saw with great interest what Bee Bee did to her buns. So I decided to try it on a slice of the Queen bread to test if it will spring back. It responded so well I decided to "massage" it a couple more times. (Don't worry, I only tested on one ;))Then I decided this loaf is truly worth making! Enjoy the "massage"!

Okay, I just to admit that sometimes, it's "人算不如天算" (meaning rather to leave it to the God to plan, than I plan). During my last post about steamed buns (mantous), I said I won't make anymore. Then I made another batch when my poor boy couldn't eat with normal rice due to his HFMD. So I had to give him steamed buns to enable him to fill his stomach, and he liked it too. After he finished the last slit buns, he called me in the office and told me he wanted more steam buns. *sweat*
Since he has requested for it, I simply couldn't reject a cute sick boy's request. So I bought more HK flour and made more steamed buns. This time, I used Gina's recipe for the mantous. As discussed in my previous post, I separated the dough and added 1.5 tbsp cocoa powder to one of the separated dough. Then I rolled it up like swiss rolls. The dough looked nice before it was steamed. However, after steaming, it cracked. The steamed bun also were not evenly rolled out based on the thickness of the colours you see. That means, I really needed more practice... This was one of my better looking steamed swirly chocolate bun.
When I stayed home the other day, I decided to try some cooking. Not salmon, but stewed pork belly. I made the slit pau, and my boy loved it! He finished most of them over the next few days. He took the paus for his three meals.
Recipe for Steamed Slit Pau with Stewed Meat, extracted from "Agnes Chang's Delightful Snacks & Dim Sum 开开心心做点心"
Steamed Slit Pau
Ingredients A:
500g HK flour, sifted
1/4 tsp Salt
1/2 tbsp Instant yeast
100g Caster sugar
240ml Water
3 tbsp Shortening
Ingredient B:
1 tbsp Baking powder
Method:
1. Mix all the ingredients A together and knead into a smooth and elastic dough.
2. Cover with a piece of wet cloth and leave to prove until it has doubled its bulk.
3. Sift B on top of the dough and knead well to distribute the baking powder* until the dough is smooth again.
4. Cover and allow dough to rest for 15mins before shaping.
* Note: Make sure you knead very well after adding in the baking powder, otherwise there will be small brownish spots on the pau skin.
Pau Skin:
1. Divide dought into 24 pieces and shape into balls. Roll each ball into oval shape and brush surface lightly with seasame oil (or shallot oil).
2. Fold each piece into half and press the edge lightly to seal.
3. Put aside to prove for 15 mins.
4. Steam over high heat for 10mins until cooked.
5. To serve, open up the slit pau and sandwich with one piece of stewed meat.
Stewed Meat:
Ingredients:
4 tbsp Cooking oil
2 tbsp chopped Shallots and garlic
500g Pork belly, cut into 1cm thick
Seasoning:
4 tbsp Soya sauce
1/4 tsp Dark soya sauce
2 tsp Sugar
1/8 tsp Pepper
1/4 tsp 5-spice powder
1 tbsp Mushroom sauce (or oyster sauce)
1 piece Star anise
1 tbsp Hua Tiao Wine (or any chinese cooking wine)
250ml Water
1 tsp Chicken stock granules
Method:
1. Heat up 4 tbsp oil in wok, stir-fry chopped garlic and onion until lightly brown. Add pork pieces and stir fry until fragrant.
2. Add seasoning, mix well and bring to boil. Reduce heat and cook until the meat is tender and sauce is thick (about an hour).
3. Dish and ready to serve with slit pau.
The slit pau that I made had brownish spots all over. Mainly because I didn't knead well after I added the baking powder. I think it'll be better if it's added together with the rest of the ingredients.
I felt that the dark soya sauce was too light. I would have added more the next time, otherwise, the stewed pork belly looks a bit pale.
I wanted to try something new in cooking salmon. And I like those with sauces on it. So I googled for "Caramel Salmon" and found some recipes for it. I requested my helper to cook it. It tasted really good. My elder son, who is a big fan of fried salmon, gave it a 98%, citing that the 2% was because it was too salty. He simply love this! Therefore, I share this recipe, hopefully you can also agree with me after you have tried it.
Recipe for Caramel Salmon, reference from http://uktv.co.uk/food/recipe/aid/576793
Ingredients:
5 Big pieces of fried cooked salmon
3 tbsp Fish sauce (can cut down to 1 tbsp as the taste was relatively strong and some people might not like it)
115g Brown sugar
3 tbsp Dark soya sauce
1 tbsp Fresh lime juice
Some fresh black pepper
Method:
1. Heat up the wok. Add some oil.
2. Stir in the fish sauce, brown sugar and dark soya sauce.
3. Add in the fried salmon to the pan and cook until the sauce is dark and syrupy. Sprinkle with black pepper, then stir in the lime juice.
4. Serve with rice. Yummy!
I had yam overdose today when I was home.
I had my yam mooncake for breakfast. The crispy skin with the soft centre was really pleasant to the palate.
Then for lunch, I pan fried my steam yam cake. I made the yam cake last week when I was home attending to my children. I thought I could make some for them to eat. However, my twins can't eat as taking yam when they have blisters will cause them to itch even more. My mum gave me this piece of good advice. Prevention is better than cure right? Therefore, there was a lot of leftovers. Okay, I'm not complaining about it. I'm more than happy to have them all by myself. I love to fry them with sweet sauce and lots of eggs. See the amount of eggs I added?
As I had some yam paste left over from making my yam mooncake, I decided to try Shirley's Teochew Yam Paste (Or Nee). However, I didn't follow her last step to push it through the sieve. So I can say, it's not as smooth as hers, but the taste is pretty good. I also didn't add gingko nuts. After taking the Or Nee, I told myself, enough yam for the day!
Edith, this is for you. :)
I had volunteered to fried bee hoon in an event organised by Precious Moments. Since she requested for a recipe, here it is as promised. :)
Recipe for Fried Bee Hoon
Serves 10 persons (if there are other added dishes)
Ingredients:
430g Peacock brand bee hoon, soaked till soft (5-10mins)
6 Chinese mushrooms, soaked and sliced
1 small Carrot, cut stripped
230g French beans, cut stripped
5 pieces garlic, chopped
5 tbsp Cooking oil for noodles
700g Swanson Chicken Stock
1 ½tbsp Dark soy sauce
4 Eggs, well beaten and add some soy sauce
3 tbsp Cooking oil for eggs
1 sprig Spring Onion, chopped
Method:
1.Heat up the wok on medium heat.
2.Add in 3 tbsp cooking oil. Then the beaten eggs. Cook till browned and remove from the wok. Put aside.
3.Add in the 5 tbsp cooking oil. Then the garlic. Stir fried till fragrant.
4.Add in the carrot, french beans and mushrooms. Stir fry. Add in half of the chicken stock and let it steep for about 3 mins.
5.When the french beans are cooked, add in the noodles, followed by the rest of the chicken stock, and the dark soy sauce.
6.Stir and mix well. Cover and let it cook. Open occasionally to mix. About 5-8 mins in total. Add more chicken stock if too dry.
7.Turn off the heat once it's ready.
8.Chopped the eggs into strips and garnish the noodles with it and spring onions.
9.Serve.
When the helper goes on her off. When the kids are confined at home. Who will prepare dinner and take care of the kids? No prize for the correct answer.
Actually we had the intention to bring the kids out on Sunday. Unfortunately, my youngest boy contracted the HFMD from his elder sister. Twins are really connected. They seemed to share the goods and bads, ups and downs and thick and thin together. I remembered there was once, when my boy got a blue-black just below his left eye, his sister got some pus on her right eye-lid. Both were due to take their portrait pictures for their school EZ link card. And their "blacken" eyes were captured. What a coincidence it was! Somehow, I always feel that they are very connected in a very special way.
Ok, back to my baking spree. Like I mention to Bee Bee, my children don't usually eat what I bake. Mainly because what I bake is what I like to eat. So instead, I chose to baking something which I think they will like - Chocolate Twist Bread from Honey Bee Sweets blog. I am very sure they love chocolates.
I wasn't sure if I had over beaten the bread dough, it didn't grow too much. Therefore, I ended up to have very small proofed dough. I wasn't able to roll out that long like what Bee Bee did. So I decided to cut it smaller and bake them in a muffin tray. I also added melted compound chocolate to the cocoa mixture to make it more chocky. Overall, I really like the taste of the chocolate twisted buns! I would probably try making it again.
After lunch, I had some time to rest and plan for my dinner. Initially I wanted to take a short nap and to make my youngest boy sleep. However, my other two children were just too noisy. In the end, I only get 40 winks (10 mins power nap). Then I was up again, preparing for dinner.
My hubby and I went to "grab" cheap whole salmons in a hypermart on Saturday morning. It was selling at $9.90/kg! We love salmons. We have the patience to queue up to take advantage of the cheap deal (for salmons only). You won't believe how much we bought. I think nobody will buy as much as us. We bought two big salmons - 4.5kg and 3.5kg. That will feed us for...3-4 weeks though. We will finish all the parts- heads, bones and the skin. I like it when my helper fries them till crispy. My eldest son usually goes for the skin...he'll eat up the skin and leave the salmon "naked". Sometimes, both of us will fight for the skin! Hahaha...
Anyway, with abundance salmon in stock the fridge, I decided to bake them for dinner. Overall, it wasn't as tasty and good as I hope, but the family members did dare not complaint. They'd better not, otherwise, no mum-made dinner for them next time. *so petty*
I made baked butter rice to go with the baked salmon with vegetables. In a baking tray, I layered portebello mushrooms, carrots, broccolis and salmons on top of one another before I topped up with cheese. Actually, the cheese that I used wasn't that suitable. It didn't melt right and wasn't mean for baking. I shall not stinge on mozzarella cheese in future. Each of them get a "set meal" of the below, where the kids have a smaller portion of the salmons.
I promised myself I won't spend money to buy mooncakes this year. I broke it. I promised myself I won't bake mooncakes this year. I broke it. So what is it that I kept my promise about mooncakes? None. I bought snow skin mooncakes for my spouse from Kia Hiang when they came to my company for the corporate sales. It tasted pretty good though and it's cheaper than others. We finished it within two days. I baked the Spiral Yam Mooncakes. I've tried Jo's recipe since two years ago, and I found the details really easy to understand and follow. This year is no exception.
The only exception this year was, I made the yam paste from scratch. You can say I have lots of time, or nothing better to do. I think I agree with either one of these. Being naive, I thought it would be easy to make the yam from scratch. However, it wasn't as easy as I thought.
Here's sharing with you exactly how I made. The steps are extracted directly from Jo's Deli. You can hop by to view her step by step pictures.
Spiral Yam Mooncakes, modified to my version.
Makes 32 mini (2" x 2") mooncakes
Ingredients:
Yam Paste:
960g Steamed and mashed yam
130g Sugar
150g Shallot oil
1/4 tsp Salt
30g Melon seeds, toasted
Water dough @ 100g:
460g Plain flour
56g Icing sugar
150g Rice bran oil
140g Water
Oil dough @ 67g:
350g Top flour
186g Shortening
1 tsp Violet colouring
Method:
To make yam paste:
1. Place mashed yam in a wok. Add salt, sugar and oil gradually into yam paste, a small portion at a time. Keep stirring at all times. Cook until the paste leaves the sides of the wok clean when stirred. Set aside to cool.
Weigh the yam paste:
2. Measure approximately 33-34g of the cooled yam paste. You should have 32pcs. Add approximately 10 melon seeds to each roll and mix well. Roll into a ball.
To prepare water dough:
3. Sift flour and icing sugar into a mixing bowl. Make a well in the middle and gradually pour in the corn oil and water. Mix well and lightly knead for about one minute until a non-sticky dough is formed. Leave the dough aside and go on to prepare oil dough.
To prepare oil dough:
4. Sift flour into another mixing bowl. Mix shortening with flour well. Add violet colouring. Do not knead this dough.
To make the mooncakes:
5. Divide water and oil dough into 8 portions. Each water dough should weigh 100g while each oil dough should weigh 67g.
6. Roll out a water dough. Wrap an oil dough with this water dough to form a ball.
7. Use a rolling pin to roll out the dough in Step 6. Roll as swiss-roll. Give the dough a quarter turn and roll out the dough length wise again. Roll as swiss-roll again. Divide it into 4 equal portions.
8. Repeat the same procedure for the remaining water and oil doughs. These pastry skins are ready to be used.
9. With the cut side face down, roll out the dough such that the edges are thinner than the centre. Wrap yam paste ball and seal the edges. Repeat the above steps to the remaining mooncakes.
10. Place mooncakes on a baking tray. Bake in a preheated fan oven at 160C for 20 mins at the centre rack. Then placed it in the lowest rack and bake for a further 10mins.
11. Transfer mooncakes to a wire rack and let cool.
Notes:
~ I didn't add a lot of sugar. The yam paste tasted a little sweet only. It tasted a lot more like yam than "sweetness". Get what I mean?
~ I measure out the yam paste then add in the melon seeds.
~ I realised that when I floured my worktop, the dough became very dry when I rolled them out. Since they don't stick to the worktop, I prefer not to flour them.
~ My violet colouring wasn't evenly mixed in the oil dough. I should have omitted the colourings.
~ I realised that my mooncake base was very thick and didn't cook thoroughly. So I put them back into the oven at the lowest rack to bake again.
Somehow, I have problem wrapping up the yam paste with the rounded dough. I get folds or "bums" on my mooncake base. Can someone teach me how to wrap it nicely? It'll be very much appreciated. :)